Archive | July, 2013

Judi Dewitt – Master Lace Maker

On Saturday I had the privilege of meeting with Judi Dewitt, Master Bobbin Lace maker.  I was able to meet her and her husband, Clyde Dewitt, at the Fort Edwards Foundation  where both are board members.  I met Judi five years ago at the Fort Edwards Family Frontier Day, and was impressed with her skill and the enthusiasm she conveys in demonstrating this rare skill.  Judi has received recognition from Tamarack, located in Beckley, West Virginia.  I interviewed her about lace making over lunch.

Judi making a lace ornament for Tamarack

Judi making a lace ornament for Tamarack

Culver – What inspired you to learn bobbin lace making?

Dewitt – I was at an Irish Fair at Wolf Trap in Virginia and saw a woman making lace which was beautiful.  I thought I could teach myself how to make lace, but life got in the way.  I still had children at home, and I was working, so there was not much time for my hobbies.  Fast forward five or so years.  I was living in Remington, Virginia and in a local flyer was an advertisement for a woman teaching bobbin lace in Remington.  I was dating my husband and we both signed up for classes.

Culver – How long did it take for you to learn bobbin lace?

Dewitt – This is a difficult question!  I was in a class of six students including my husband.  We met every Monday night for 1 1/2 hours.  We started by learning how to make the “stitches” which are made by crossing or twisting threads.  There are three “stitches” – the half stitch, whole stitch and whole stitch twist.  The braiding (plaiting) stitch is made by doing the whole stitch over and over again.  We learned how to start and end a piece.  The best project to learn on is a bookmark.  We made many of these.  Then we moved on to more complex designs.  We took lessons for about six years.  Then we moved to West Virginia.

Culver – How long have you been demonstrating your art at Fort Edwards?

Dewitt – It has been about five years.  We did our first demonstrations at the craft co-op at the Barn in Lost River, WV and have demonstrated in several places.

Culver – How was lace produced in Colonial America?

Dewitt – The way I make lace is the same way the colonial women made it – with a pillow of straw, pins, and bobbins.  Lace was being made during “our” time frame at Fort Edwards, so my husband and I can demonstrate lace making the way lace was made in the 1700’s.  Our equipment is all modern design but the techniques are the same.  We have a pillow made with a high density foam and covered with a cloth to protect it.  In the old days, the pillow was stuffed tightly with straw.  The firmness holds the pins in place.  We use brass pins because they do not rust.  My bobbins are made of wood and spangled with beads for weight and to keep them from rolling.

Culver – Why is the bobbin lace you make called “Torchon?”

Dewitt – Different laces are made with different angles.  For example, Torchon lace is made with 90 degree angles.  Flanders lace is worked on a grid with 45 degree angles, and Bucks Point uses a 60 degree grid.

Culver – How long does it take to make lace?

Dewitt –  On average, it takes about an hour to make an inch of lace, sometimes more if the pattern is complicated.  The lace Christmas ornaments that I am making for Tamarack are about four inches and they take several hours, usually about five hours.  More time is needed when the pattern is complex.

Culver – Do you have any of your lace on your cloths?

Dewitt – The only place I have any lace on my reenactor clothes is on my historically correct cap that I wear at Fort Edwards.  I would love to make flounces to go on dresses and jackets.

Culver – Have you ever considered writing a book teaching the basic skills to make lace?

Dewitt – No, this is something to think about. 

Culver – What is your background in the arts?

Dewitt – I have been an artist ever since I can remember.  I have drawn with pencil, pen and ink, I paint in oils and watercolors and am a published illustrator.  I am a knitter, crocheter, love to sew and quilt.  Since moving to West Virginia I have learned to rug hook.  I design and hook my own rugs.  My next big adventure is to dye my own wool.  I also love doing cross stitch.  For opening day at Fort Edwards next year I am going to design a cross-stitch pattern and teach the children the techniques of this embroidery.

Culver – You must be busy!  With all these skills of yours, why do you continue to make lace?

Dewitt – There are so many pretty designs to make.  I have several books filled with beautiful edgings for pillow cases, towels and clothing.  I have three grown sons and one day they asked me why I don’t just buy lace…I told them I make it because I enjoy it.  I work with simple thread, brass pins, bobbins, a pillow and a design and make something truly beautiful.  I am part of a group that is keeping an ancient craft alive.    I never run out of ideas or things to do.  I just get tired and need a nap so that I can continue making pretty things.

Judi in the historic garden at Fort Edwards, Capon Bridge, WV

Judi in the historic garden at Fort Edwards, Capon Bridge, WV

Judi will be teaching a bobbin lace making workshop at Fort Edwards on September 28, 2013.  She also provides private instruction, and prefers teaching only one student at a time so that the student will have her undivided attention.  I can personally attest that Judi is a superior teacher with a true love of the skill and the ability to convey it to others.  Judi’s ornaments can be purchased at Tamarack, and she also accepts commissions.  She can be contacted by emailing her at jadewitt@hughes.net.

Edit to add:  Emily Estrad shows amazing examples of bobbin lace in her fibretown podcast http://www.fibretown.blogspot.com/2013/07/episode-23-bobbin-lace-mind-blown.html Make sure you watch it to see the bobbin lace fan, clutch, necklace and amazing shawl, while must have miles of silk thread in it!


Meals at Meduseld – Moor Park Apricot Tart


Moor Park Apricot

Moor Park Apricot

“It was only the spring twelvemonth before Mr. Norris’s death that we put in the apricot against the stable wall, which is now grown such a noble tree, and getting to such perfection, sir,” addressing herself then to Dr. Grant.

“The tree thrives well, beyond a doubt, madam,” replied Dr. Grant. “The soil is good and I never pass it without regretting that the fruit should be so little worth the trouble of gathering.”

“Sir, it is a Moor Park, we bought it as a Moor Park, and it cost us–that is, it was a present from Sir Thomas, but I saw the bill–and I know it cost seven shillings, and was charged as a Moor Park.”

“You were imposed on, ma’am,” replied Dr. Grant: “these potatoes have as much the flavour of a Moor Park apricot as the fruit from that tree. It is an insipid fruit at the best, but a good apricot is eatable, which none from my garden are.”

As a great fan of Jane Austen, I have been determined to grow a Moor Park apricot tree.   The first tree was planted about thirteen years ago, but suffered a collision with a trailer, and is still struggling to get past that challenge.  I planted another pair of Moor Parks in front of our cottage/office and one succumbed to insect damage at its base.  But small victories do sometimes  occur and mine was to feast yesterday on my very own juicy Moor Park Apricot.

I have to disagree with Dr. Grant.  It is sweet and honeyish with just a hint of tartness.   And for this tree’s first crop it produced enough to make an apricot tart.  Here is how we did it.

Tart crust

2 packages of cream cheese

1 cup butter

2 1/2 cups pastry flour

1/4 confectioners sugar

Combine all ingredients into dough and roll or press into a large tart pan or two medium.  I made a large tart and had enough left for 8 little tart shells.


Glaze

10 oz jelly, preferably apricot or peach.  I used Crofters Blood orange jelly because it’s what I had and its tastes wonderful.

8 oz water.

Combine both in thick bottomed pan until a nice rolling boil.  Turn off heat and reserve.


Assembly

Wash apricots and cut each into quarters.  Arrange decoratively in your tart shell.  Spoon the glaze over the apricots pieces. 


Moor Park Apricot Tart Ready for the Oven

Moor Park Apricot Tart Ready for the Oven

Bake in a 375 over until apricots have softened and the crust has developed a golden brown color, approximately 55 minutes.  this time varies greatly depending on the size tart you are baking.  The little tartlets bake in approximately 30 minutes, for example.


Meduseld's Moor Park Apricot Tartlets

Meduseld’s Moor Park Apricot Tartlets

I suspect even Dr. Grant would eat this.


Meals at Meduseld – Carol’s Lasagna

My friend Carol has done the coolest, most generous  things all her life, including being the recipient of an award for her work at the White House.   She is also an incredible cook and her sugar cookies are worth writing about in your diary.  One of the other items she makes that stands out is lasagna, and I was recently able to extract her recipe from her.  She provided the sauce for the lasagna you see in these pictures. 

 A pasta machine is not necessary, but you’ll need a crock pot/slow cooker for the sauce.  Carol starts her sauce the night before and lets it cook twelve hours. 

TIPS:  Have all ingredients ready to go for assembling before you do the noodles, unless you are using store noodles.  Homemade noodles dry quickly and you’ll have to assemble the layers fast.

We made homemade lasagna noodles – somehow store-bought did not seem worthy, but you are welcome to use those.   We love our pasta machine and have placed it in our amazon store. 

Sauce

1 pound ground beef (try to find pasture raised)

3  hot italian sausages

mushrooms

1 green pepper

1 red pepper

onion

1 medium or two small zucchinis

I can tomato sauce

3 cans chopped tomatoes (Delmonte or Muir Glen)

half an eggplant, pealed and diced

Wine, often a sweet wine like Marsala

Brown onion and meats.  Put in crock pot.  Chop vegetables into chuncks.  Add these to crockpot.  Pour over canned chopped tomatoes.  Season to taste with salt, pepper and oregano.

Let this cook 10-12 hours  in your crockpot.

Noodles

4 cups flour

6 egg yolks

1/4 cup water

Combine flour and egg yolks.  Dribble in water until firm dough forms.  You don’t want your dough sticky or it won’t go through the pasta machine.  You can also roll the dough very thinly with a rolling-pin and them cut slices or noodles.

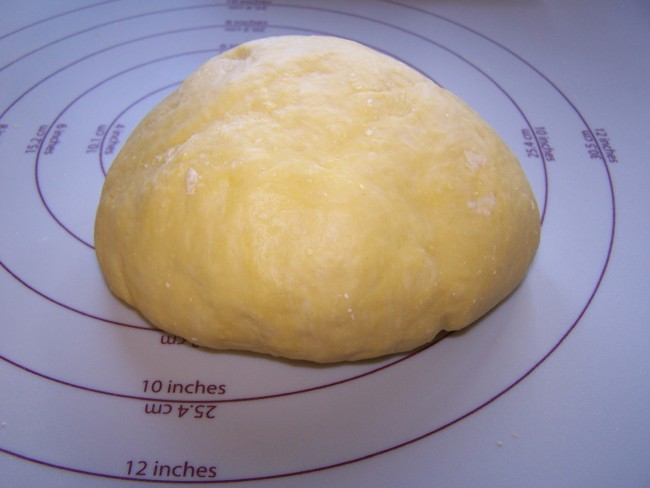
Knead dough until it’s a nice uniform golden color with no distinct bits of flour.  This is what ours looked like.  Our farm egg yolks give it this rich golden color.

Egg noodle dough

Egg noodle dough

Take small sections of the dough, and either put it through your pasta machine or roll it out on the surface.  Only roll out enough pieces for one layer of the lasagna at a time.

Creating Noodles

Creating Noodles

For Assembly, you’ll need a few more ingredients.

Ricotta cheese

Grated cheese

To assemble

We spread sauce on the bottom of the pan.  I put slices of zucchini on the bottom, more sauce and a dollop of Ricotta on each one.  Cover with layer of noodles.  Add more sauce, more Ricotta, a generous bit of shredded cheese and another layer of noodles.  More sauce, generous layer of shredded cheese and another layer of noodles. 

Building the Lasagna Layers

Building the Lasagna Layers

This is now the top layer.  More sauce and generous shredded cheese.  I chopped some fresh basil from the garden and sprinkled it on top.  This is how the lasagna looked going into the oven.

Lasagna Ready for Baking

Lasagna Ready for Baking

Bake this at 350 for over an hour until it is bubbling  and the center is cooked.  You may have to cover the lasagna during the baking process so that the cheese on top does not get too brown.

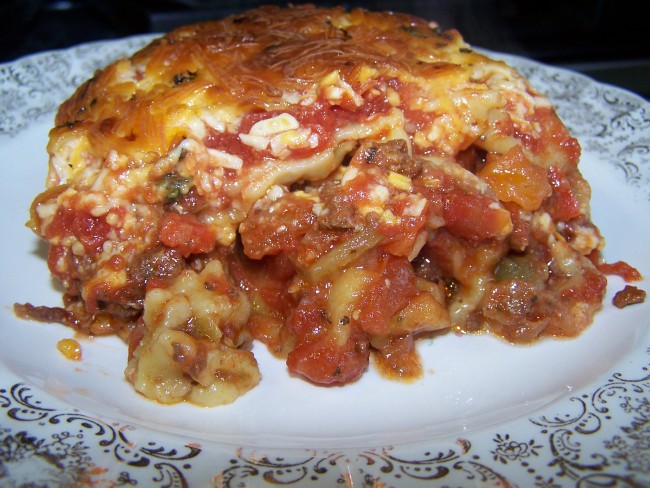
Here is the finished result, and it tasted as good as it looks!  Thank you, Carol!

100_7099b