Guest Knitter and Yarn Review

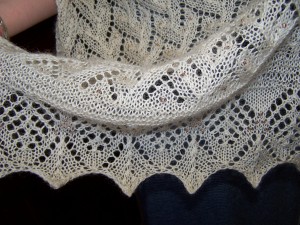
I am very fortunate to have among my dear friends an expert knitter, Kate.  Her creations are quite simply stunning and she regularly shows up wearing a gossamer web of gorgeous knitted lace.  The last time she came over, she was wearing this:

Here is another view:

She made this with Meduseld’s Romney yarn in the fingerling weight (available in Meduseld’s Farm store).  You can see in the second picture that she beaded the shawl as well.   If you click on the pictures you can see the pattern enlarged.

Everyone, meet Kate!

………………………………………………………………………………

I’ve always drooled over the books of Estonian lace shawls, so this summer I decided to make one for my sister’s wedding. I found a pattern I liked in “Knitted Lace of Estonia,” by Nancy Bush: Madli’s Shawl (in Meduseld’s Amazon store). The center pattern is called Haga, which means twig, or small branch. The original pattern calls for nupps at the ends of the “twigs,” but I decided to put crystal beads with bronzey gold centers in their place, to add some weight and drape, and just a little sparkle.

The wool was lovely and easy to work with, and after washing and blocking, has a nice drape and sheen to it. I used a slightly larger needle, a size six, because I wanted to emphasize the light, lacy texture. I haven’t shown it to my sister yet, but I can hardly wait to…

………………………………………………………………………………..

Check back for other posts about Kate.  Soon, we will have another post with a pattern for a shawlette that was designed by Kate.

Dying Wool

Another winter acivity at Meduseld is preparing wool for hand spinning or for sending off to the fiber mill.  Yesterday, I spent much of the day cleaning and dying wool.  These batches of wool will be combined into a multi color yarn.  Following are the steps to clean and dye the wool.

I took Royal’s fleece from last year.  She is a lovely purebred Romney ewe who is friendly and always one of the first at the feed trough.  She produces a high sheen yarn and she makes about 8 pounds of fleece per year.  That is the weight before it is washed of its lanolin.  Between that and the loss that always ocurrs during processing, we’ll end up with about half of that in yarn.

First, take the fleece and wash it in the hottest water the tap will provide.  Dawn dishwashing soap seems to be a favorite among wool enthusiasts, but we prefer to use organic detergents.  Usually, we use Ecover which does a wonderful job removing the grease.  You want to make sure you don’t handle the wool too much  – its not like hand washing clothes.  You want to move it about enough to get it to shake free the dirt and lanolin, but you don’t want to over compensate and felt your fiber.  Felting just doesn’t come undone.  Rinse several times with hot water until the water comes out clear.   I don’t worry about making it crystal clear at this point since I am about to simmer the wool.  Here is the cleaned fiber in a large stainless pot.


It is important to use stainless or enamal cookware since we are going to be using Cushings Perfection acid dyes.  You don’t want to have a chemical reaction with your pot or stirring spoon, and aluminum will react.  I am using a stainless spoon, but I also have a wooden spoon that I reserve just for dying wool.

This is what the Cushing Perfection Dye packets look like.  Each packet is costs around  $3.00 and will color approximately one pound of wool, although I have had success with larger amounts.   Cushing recommends 1/2 cup vinegar per pound of fiber, but you can use more.  I used one cup of white vinegar that you can buy at any grocery store.   A good pair of rubber gloves would handy, too.

Combine boiling water, the dye packet and the vinegar.  Try to eyeball how much water you’ll need to cover the amount of wool you are dying.  Cushing says to wet the wool, but ours is already wet from washing.  Now, quickly and smoothly, put all your wool in the pot.  You have to be rather quick about it, or the portion you put in first is going to be darker than the part to go in last.  Stir the fleece around a bit and make sure that all parts are exposed to the dye liquid.

Now, we are going to heat this back up to a simmer and let it stay that way until the wool absorbs the dye.  You can see the difference, because suddenly the water will go from being richly pigmented, to suddenly looking almost clear, and your wool will have taken on the dye.  It is very important to continue to gently stir periodically during this process so that you achieve even distribution of the color.  Here is a picture of my dye pot, and you can see around the edges that the water is still quite dark.

Cotinue stirring until the water clears and look for uniform color in your wool.  This blue is turning out nicely, with deep bold coloring.

Take the pot off the stove and drain the wool.  Rinse several times in hot water until the water is clear.  You don’t want to rinse in cold water because this might cause the wool to felt.  It is important to make your temperature changes gradually.  I make each rinse slightly cooler so that by the last rinse I can handle the wool.

Now the wool goes out on the drying racks.  This time of year it may take several days to dry, especially if the temperatures remain freezing.  During the summer, it will dry overnight.  Here I have several batches set out to dry. 

You can see Cushing’s Blue, Burgundy, and Egyptian Red drying on my porch.  When these are dry enough to card, which means to comb the fibers, I’ll have a post on carding and spinning to make a multi-colored yarn. 


Thorough Explanation of GMOs and Glyphosate

In this interview with Dr. Mercola, Dr. Don Huber gives a thorough presentation on the problems associated with GMO crops and the use of glyphosate, commonly known as Round UP.  He discusses that it was originally patented as a chelator, and due to these properties, micro-nutrients are not being bound in plants – meaning that those plants become deficient in those micro-nutrients.  According to Huber, this can disrupt enzyme functions which in turn can disrupt endocrine systems.  The interview is 57 minutes long, but it is definitely worth watching every minute of it.

Dr. Huber is a staff professor at Purdue University.  He is an agricultural scientist and expert in microbial ecology.

http://www.youtube.com/watch?v=X4swW9OFmf8&feature=player_embedded


New Winter Projects and Yarn Review

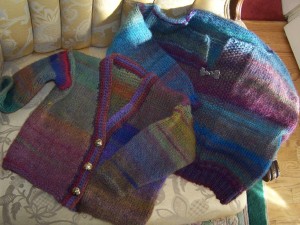
Sometimes at Meduseld, we do use yarn that was not made by our own flock.  This morning I finished putting together two sweaters I had been working on since a few weeks before Christmas.   In this case, I used a Lion Brand Yarn called Amazing because I was intrigued by the color palettes that the line had.  The larger sweater was knitted in the color Glacier and the smaller was done in Wildflower.

The recommended knitting needle size was US 9, but both were knitted up in US 7 in order to get a smoother look.  The smaller sweater was finished around the neck with crochet, and I used an F hook instead of the suggested J.   I used four skeins for the small sweater and 5 skeins for the large, although I bought extra.  The extra was used to match colors when a skein would run out, so now there is leftover yarn, but it helped prevent abrupt color stops and starts.

This was a very nice yarn to work with.  The yarn is composed of 53% wool and 47% acrylic and does not have an artificial feel.  Fortunately, it is machine wash cool, and dry flat, which makes it easy maintenance, especially for children’s clothes.  There were few down sides.  One was that this yarn does not unravel easily; there is just enough fuzz that it catches and prevents undoing your work.  I only had to do this once, on the crochet edging, but it did prevent me from unwinding as far back as needed.  The other downside is matching all the colors in a way that makes the garment look uniform when finished, especially when making the seams at the end.  My great knitter friend has been knitting most of her sweaters lately with the top down method on circular needles so that she has fewer seams, and I think this yarn would benefit from this method, as it would likely show off the spectacular color patterns to their best advantage. 


Winter Projects – Aran Crochet Sweater


April 25, 2013 Update:  The patterns for making the cables in the sweater are now provided in this post!

Here is another of those winter chores that never bore!

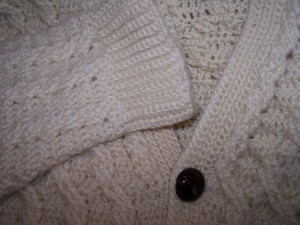
This is an aran crocheted sweater made with 100 percent Romney wool in worsted weight.  This sweater was made in “extra large,” and used approximately 2000 yards of worsted wool.  This wool and and others in different weights from fingerling to bulky, are available in our store.

Formerly, people said that aran sweaters could not be crocheted, that the intricate patterns created and admired on the fair green isle of Ireland could only be done with knitting needles.  Recently, however, several books have come out showing that this technique can be replicated easily with the crochet hook and the results are lovely.  The additional bonus is that while crochet does use more yarn than knitting, the resulting “fabric” is denser and more insulating.

At Meduseld, the Romney sheep fleeces have a very high sheen, which creates the glossy look to the yarn that you see in the photos.  When we bought our first sheep, finding ones with top-of-the-line fleeces was important, and we have continued to breed that quality in our Romney line. 


Hoop-house Gardening

As promised, we are starting with the first post about winter farm activities, and it is one of our personal favorites. 

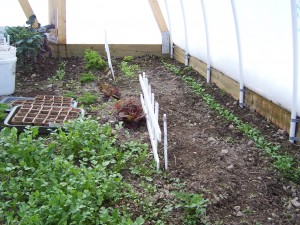
We began hoop house, or tunnel gardening after I bought Eliot Coleman’s book, The Four Season Harvest, as a Christmas present for my spouse.  We started our first hoop house that January, a small structure, only 12×16 feet, made of PVC pipe and some boards.  By March we were enjoying salad, radishes, and cilantro.  That winter may have been a warmer winter than most, but we were sincerely impressed with our first attempt.

Inside first hoophouse.  First year.  This also gives a good look at the PVC bracing for do-it-yourselfers who want to make one for yourselves.

Inside first hoophouse. First year. This also gives a good look at the PVC bracing for do-it-yourselfers who want to make one for yourselves.

That little structure is now gone and has been replaced by two sturdier versions made of bent fencing and a wood “foundation.”  Both are set directly on the ground and we plant directly in the soil.  We have one layer of agricultural plastic on one and two layers on the other.  Each layer is supposed to give us approximately one more agricultural growth zone, but we find that the extra layer actually reduces the amount of sunlight, so you don’t actually get two full zones.  Meduseld is in a 6b agricultural zone, and we are not getting to 8b with the extra layer.  We find that the plants in the one layer house seem to do better, and when the weather warms, we will reduce the other to one layer as well.

We have been working on amending the soil gradually and I wish we had focused on this more during construction phase.  We have still had to contend with insects and less than ideal growth at times, and we think this is due to the fact that we did not follow all Mr. Coleman’s advice about soil amendments, especially copious amounts of compost.  Over the years, we have gotten better at composting, and hopefully this will pay off.

None-the-less we have enjoyed chard, lettuce, fresh herbs, brassicas, every year since but one.  That year was exceptionally cold and there was not enough sunlight to warm the soil during the day.   We could have resorted to heating the tunnels, but that seems contrary to what we are trying to achieve – namely growing produce without consuming non-renewable energy.

Hoop houses are wonderful for rotating “crops” and for extending growing seasons.  There is also no waste.  Anything that does not do well,  becomes overgrown, or gets insects, becomes chicken feed.  We see this as a win/win situation even if we can’t put something on our table – we’re certain the chickens are glad for fresh greens in the middle of the winter, or as the case today, right after a snow storm.

Mr. Coleman’s book had excellent charts with plants that can be grown during the winter months and that are tolerant to cold temperatures.  We strongly recommend this book and it is available in the Meduseld Amazon store.


Merry Christmas!

Merry Christmas wishes from Meduseld!

There is the impression that farm life slows during the winter months.  Not true!  We are going to share the activities of the cold months with you and provide links and information so that you can do these as well.  Of if you prefer, you can just follow along, as we work here at Meduseld.

We have been asked – why Meduseld?  Meduseld is the anglicized version of the anglo-saxon word maeduselde, which means mead hall.  Since we raise bees and are interested in Beowulf and medieval hsitory, we thougth the name is appropriate.  We choose to use the simplified version; its much easier to provide as a web address:)

The next posts will cover hoop or tunnel house gardening, maple syrup making, spinning and dyeing wool, and livestock care.

 logo_meduseld150B


Marvelous, Medicinal Honey

Via Dr. Mercola, learn about the incredible health benefits of natural honey, available directly from Meduseld’s online store.

Meduseld honey - available in glass jars and squeeze bottles

Meduseld honey - available in glass jars and squeeze bottles

The Sweet Golden Treat That Can Help Wipe Out Deadly MRSA

Honey was a conventional therapy in fighting infection up until the early 20th century, at which time its use slowly vanished with the advent of penicillin.

Now the use of honey in wound care is regaining popularity again, as researchers are determining exactly how honey can help fight serious skin infections.

According to their findings, certain types of honey might be more effective than antibiotics!

After any skin injury, bacteria that live on your skin can infect and penetrate the wound site.

One particularly common type of strep (Streptococcus pyogenes) can result in wounds that refuse to heal.

But honey, especially the kind made by bees foraging on manuka flowers, was found to destroy these bacteria.

Scientific American recently reported:

“In lab tests, just a bit of the honey killed off the majority of bacterial cells — and cut down dramatically on the stubborn biofilms they formed.

It could also be used to prevent wounds from becoming infected in the first place.”

According to the authors of the study,

These findings indicate that manuka honey has potential in the topical treatment of wounds containing S. pyogenes.” ii

Should You Dress Your Wounds with Honey?

As long as you use the right kind of honey, science does back up its use for wound treatment, which is especially relevant today as antibiotic-resistant bacterial infections are on the rise.

Five years ago, the FDA authorized the first honey-based medical product for use in the US. Derma Sciences uses Manuka honey for their Medihoney wound and burn dressings, which can be found online from medical supply stores. Amazon.com also sells them. These products can also be found in Great Britain, Australia, New Zealand, and Canada.

When considering using honey for the treatment of wounds, it’s extremely important to understand that there’s a major difference between raw honey—and especially Manuka honey, which is in a class of its own—and the highly processed “Grade A” type honey you find in most grocery stores. The latter is more akin to high fructose corn syrup, which is more likely to increase infection, and should never be used to treat topical wounds! (It also will not offer you the same health benefits as raw honey when consumed.)

Manuka honey, on the other hand, is made with pollen gathered from the flowers of the Manuka bush (a medicinal plant), and clinical trials have found this type of honey can effectively eradicate more than 250 clinical strains of bacteria, including resistant varieties such as:

  • MRSA (methicillin resistant Staphylococcus aureus)
  • MSSA (methicillin sensitive Staphylococcus aureus)
  • VRE (vancomycin-resistant enterococci)

Compared to other types of honey, Manuka has an extra ingredient with antimicrobial qualities, called the Unique Manuka Factor (UMF). It is so called because no one has yet been able to discover the unique substance involved that gives it its extraordinary antibacterial activity. Honey releases hydrogen peroxide through an enzymatic process, which explains its general antiseptic qualities, but Active Manuka honey contains “something else” that makes it far superior to other types of honey when it comes to killing off bacteria.

The level of UMF can vary between batches, so each batch is ranked and priced accordingly. The higher the concentration of UMF, the darker, thicker, and more expensive it is.

To determine its rating, a sample of the honey batch is placed on a plate with a bacterial culture. The area where the bacterial growth stops is then measured. This area is compared to a similar area produced by a solution of phenol and water. The UMF number refers to the equivalent percentage of phenol in water, so, for example, honey with a UMF rating of 10 has the same antibacterial strength as 10 percent phenol. A rating of UMF 10 or higher is recommended for medicinal use.

Evidence Supporting Use of Honey against Infectious Bacteria

Aside from the featured study, many others confirm the soundness of using good-old-fashioned honey for the treatment of bacterial and fungal infections. For example, a 1992 study found that honey sped up the healing of caesarean sections iii, iv. Another study found that honey cured the intractable wounds of 59 patients, and it’s been known to help heal everything from ulcers to sunburn. According to the International Journal of Lower Extremity Wounds, positive findings on honey in wound care have been reported from v:

  • 17 randomized controlled trials involving a total of 1965 participants
  • Five clinical trials of other forms involving 97 participants
  • 16 trials on a total of 533 wounds on experimental animals

A study published in the summer of 2009 also found that chronic rhinosinusitis sufferers might benefit from honey vi. In 11 isolates of three separate biofilms, honey was found to be significantly more effective than commonly-used antibiotics in killing both planktonic and biofilm-grown forms of pseudomonas aeruginosa (PA) and staphylococcus aureus (SA), two important factors in chronic rhinosinusitis (CRS).

The findings may hold important clinical implications in the treatment of CRS, which affects 31 million people each year in the United States alone, and is among the three most common chronic diseases in North America.

Helpful Additions to Your Home First Aid Kit

If you’re considering using honey to treat a mild burn, sunburn, or small wound at home, make sure to use either Manuka or raw honey. Like the Manuka honey, high quality RAW honey will help draw fluid away from your wound and suppress the growth of microorganisms. Part of what gives raw honey its antibacterial properties is an enzyme called glucose oxidase, which the worker bees excrete into the nectar. This enzyme releases low levels of hydrogen peroxide when the honey makes contact with your wound. A chemical reaction between the honey and the tissue also makes your wound smell good. Heated honey will destroy this perishable enzyme which is why you want to only use raw honey for this application.

For your home care kit, two other natural wound dressings that offer impressive results without drugs are Duoderm and HemCon bandages. The HemCon bandages are made from a natural protein found in shrimp shells, which not only promotes clotting, but also offer an effective antibacterial barrier against microorganisms such as MRSA and VRE—two common antibiotic-resistant strains.

While the focus of this article is on the topical uses and benefits of honey, it also has numerous health benefits when consumed in moderation.

Unfortunately, bee populations are rapidly declining.  Farmers are forced to import bees from other countries or truck them across the states for different seasons of produce.  Toxic chemicals, genetically engineered crops, overuse of antibiotics in animals (their waste is typically used as fertilizer) and monoculture farming are likely the primary contributors to the collapse of the bees.

The collapse of bee colonies should be looked at as yet further proof of our unsustainable farming methods.

References: